Code
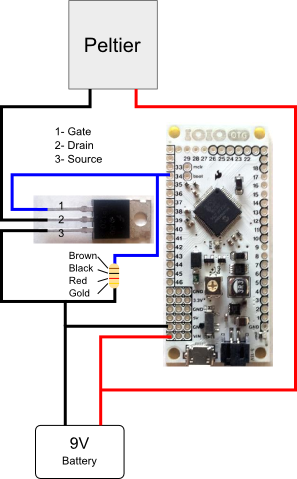
The code is a simple Hello IOIO with a scrollbar to control the temperature of the
Peltier. We control the temperature by using a PWM pin (I used 34) to turn the
MOSFET on and off.
public class GlassHeatMain extends IOIOActivity
                           implements OnSeekBarChangeListener{

 private static final String TAG = "HeatGlassMain";

 //Peltier controls
 private final int mOutHeatPin = 34;    //This pin can serve as PWM output
 private final int mPWMFreq = 100;      //The frequency of the PWM signal
 private final int POLLING_DELAY = 150; //Wait this lont to update the signal
 private final int MULTIPLIER = 100;

 //HeatBar UI
 private SeekBar mHeatBar;
 private int mHeatValue;
 private TextView mHeatText;
 private long mLastChange;
This first part is the basic setup. Start a pin (34 in this case) to be a PWM
output and the variables that we will be using.
We also set up a scrollbar to control the PWM output.
 @Override
 public void onCreate(Bundle savedInstanceState) {
  super.onCreate(savedInstanceState);
  setContentView(R.layout.activity_main);

  //Heat
  mHeatText = (TextView) findViewById(R.id.seekBarText);
  mHeatBar = (SeekBar) findViewById(R.id.seekBarHeat);
  mHeatBar.setOnSeekBarChangeListener(this);
  mHeatBar.setProgress(0);

 }
Again, basic UI setup.
 @Override
  protected void onStart() {
   super.onStart();
 }

 @Override
 protected void onStop() {
  super.onStop();
 }
These methods control the
Activity Lifecycle
 class Looper extends BaseIOIOLooper {
  //Heat
  private PwmOutput mHeatPWM;

  @Override
  protected void setup() throws ConnectionLostException {
   mHeatPWM = ioio_.openPwmOutput(mOutHeatPin, mPWMFreq);
  }
Here we actually tell the IOIO board to set the pint as
PWM output.
  @Override
  public void loop() throws ConnectionLostException {
   try {
    mHeatValue = mHeatBar.getProgress();
    mHeatPWM.setPulseWidth(mHeatValue*MULTIPLIER);
    Log.i(TAG, "setPulseWidth: "+ mHeatValue*MULTIPLIER);

    Thread.sleep(100);
    } catch (InterruptedException e) {
    }
  }
 }
In the loop we constantly check for the value of the ScrollBar and send that value
to the pin to control the Peltier.
The ScrollBar value is multiplied by the MULTIPLIER. I found that I had to do this
so that the heat on the Peltier was actually noticeable within the values of the
ScrollBar
Finally the thread sleeps for 100 milliseconds before looping again.
 @Override
 protected IOIOLooper createIOIOLooper() {
  return new Looper();
 }

 @Override
 public void onStartTrackingTouch(SeekBar seekBar) {
  mLastChange = System.currentTimeMillis();
 }
Set the initial value of the MLastChange variable to the current time.
@Override
 public void onProgressChanged(SeekBar seekBar, int prog, boolean fromUser) {

  if (System.currentTimeMillis() - mLastChange > POLLING_DELAY) {
   handleHeat(seekBar);
   mLastChange = System.currentTimeMillis();
  }
 }
Compare the time elapsed since last check with the POLLING_DELAY variable. If the
elapsed time is more than the POLLING_DELAY then reset then go to the handleHeat()
method and reset the mLastChange variable for the next comparison.
 @Override
 public void onStopTrackingTouch(SeekBar seekBar) {
  handleHeat(seekBar);
 }
Also go to the handleHeat() method if the user has stopped touching the ScrollBar.
 private void handleHeat(final SeekBar seekBar){
  mHeatValue = seekBar.getProgress();
  mHeatText.setText("Heat Value: " + mHeatValue*MULTIPLIER);
 }
}
The method that updates the mHeatValue variable with the value on the ScrollBar
and also updates the text on the UI.
|
 images are
CC BY-NC-SA 3.0
images are
CC BY-NC-SA 3.0