Code
public class TempSensingMain extends IOIOActivity {
  private final String TAG = "TempSensingMain";

  //Sensor I2C
  private TwiMaster twi;
  double sensortemp;

  //UI
  private TextView TempCelsius1;
  private TextView TempFahrenheit1;
  private TextView TempCelsius2;
  private TextView TempFahrenheit2;
  private TextView TempCelsius3;
  private TextView TempFahrenheit3;
Declaration of the TwiMaster interface and other variables. Also one text per sensor.
  @Override
  public void onCreate(Bundle savedInstanceState) {
    super.onCreate(savedInstanceState);
    setContentView(R.layout.activity_temp_sensing_main);

    TempCelsius1 = (TextView) findViewById(R.id.tempC1);
    TempFahrenheit1 = (TextView) findViewById(R.id.tempF1);
    TempCelsius2 = (TextView) findViewById(R.id.tempC2);
    TempFahrenheit2 = (TextView) findViewById(R.id.tempF2);
    TempCelsius3 = (TextView) findViewById(R.id.tempC3);
    TempFahrenheit3 = (TextView) findViewById(R.id.tempF3);
  }
Initializing the TextViews
  class Looper extends BaseIOIOLooper {

    @Override
    protected void setup() throws ConnectionLostException {
      twi = ioio_.openTwiMaster(0, TwiMaster.Rate.RATE_100KHz, true);
      //InitSensor(0x00, twi);
      checkAddress(twi);
    }

    @Override
    public void loop() throws ConnectionLostException {
      try {
        ReadSensor(0x34, twi);		//dec 52
        ReadSensor(0x2a, twi);		//dec 42
        ReadSensor(0x5a, twi);		//dec 90

        Thread.sleep(100);
      } catch (InterruptedException e) {
      }
    }
  }
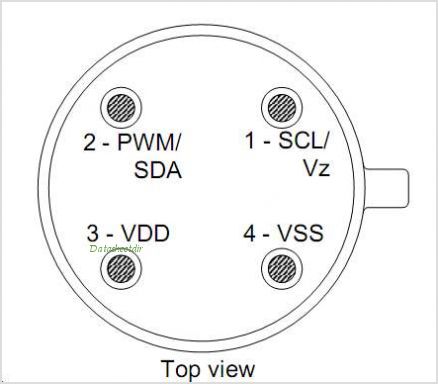
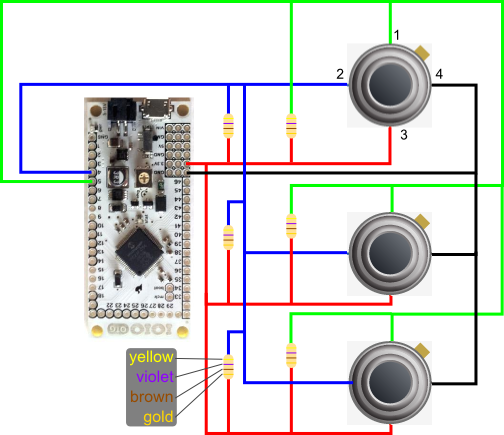
This is a key step! Each sensor needs to have a different address so that it can be
accessed by the IOIO. the default address is 0x5A but the other addresses need to be
set manually. I don't yet have the code to do this. I used the code from
Connecting Infrared Thermometer MLX90614 to Wiring
and used an Arduino to do this. However, the address was not the number I wanted
so my sensors were los for a while and I had to write a loop that would go through
every address and look for a response until a found the valid addresses.
  @Override
  protected IOIOLooper createIOIOLooper() {
    return new Looper();
  }

  public void ReadSensor(int address, TwiMaster port) {


    byte[] request = new byte[] { 0x07 }; //Byte address of sensor data
    byte[] tempdata = new byte[2];        //Byte to save sensor data
    double receivedTemp = 0x0000;         //Value after processing sensor
                                          //data
    double tempFactor = 0.02;             //0.02 degrees per LSB
                                          //(measurement resolution of
                                          // the MLX90614)

    byte[] getAddress = new byte[] { 0x6f };
    byte[] getByte = new byte [2];

    try {

      port.writeRead(  address,
                       false,
                       request,
                       request.length,
                       tempdata,
                       tempdata.length);

      receivedTemp = (double)(((tempdata[1] & 0x007f) << 8)+ tempdata[0]);
      receivedTemp = (receivedTemp * tempFactor)-0.01;

      handleTemp(address, receivedTemp);

    } catch (ConnectionLostException e) {
      // TODO Auto-generated catch block
      e.printStackTrace();
    } catch (InterruptedException e) {
      // TODO Auto-generated catch block
      e.printStackTrace();
    }
  }
This method reads the temperature from each sensor according to their address. The
memory location where the data resides is 0x07 and it returns 2 bytes 'tempdata[0] and
tempdata[1]' that are arranged and multiplied by the 'tempFactor'. The final number
is sent to 'handleTemp' to finally display the value.
  private void handleTemp (double address, double temp){

    final float celsius = (float) (temp - 273.15);

    final float fahrenheit = (float) ((celsius*1.8) + 32);

    switch ((int)address){
    case 90:
      TempCelsius1.post(new Runnable() {
        public void run() {
          TempCelsius1.setText("Celsius 1: "+ celsius);
          TempFahrenheit1.setText("Fahrenheit 1: "+ fahrenheit);
        }
      });
      break;
    case 42:
      TempCelsius2.post(new Runnable() {
        public void run() {
          TempCelsius2.setText("Celsius 2: "+ celsius);
          TempFahrenheit2.setText("Fahrenheit 2: "+ fahrenheit);
        }
      });
      break;
    case 52:
      TempCelsius3.post(new Runnable() {
        public void run() {
          TempCelsius3.setText("Celsius 3: "+ celsius);
          TempFahrenheit3.setText("Fahrenheit 3: "+ fahrenheit);
        }
      });
      break;
    }
  }
}
This method creates runnables to pass the value to the UI thread and update the view.
|
 images are
CC BY-NC-SA 3.0
images are
CC BY-NC-SA 3.0